The Canonical Trick Play & Its Punishment
PT-BR: Você pode assistir ao meu respectivo vídeo aqui.
You can download all of the SGFs used in this post here. I use Sabaki as my editor, which features some extra blings on the game tree. So, in order to extract the most from my SGFs, I advise you to use it too. Don't forget to donate to the Sabaki project too!
This wasn't supposed to be this long. I wanted it to be a simple post,
a short English version of a tiny video I was going to post in
Portuguese for
I'm at least 1 dan on most Go servers, so I do have some authority, if you care about these things. Nonetheless, I try to expose my rationel throughout the article, and I'm always open to feedback.
In the next section, I'll expose the digested version of all the sequences, but all of them are in the main SGF accompanying this post. You can also dive deep into the rabbit hole, if you wish, by going through all of the collected references, listed in the last section.
Interestingly enough, some pros have played this move, and the games are searchable through Waltheri's Go Pattern Search. Nevertheless, more surprisingly, even Shusaku has faced this pattern in one of his games; and, even more astonishing, is that he seems to have subscribed to the supposedly more correct punishment.
Andrew Simons also points out that the more correct punishment was known even before the AI era. And AIs nowadays even go as far as to rank the descent as worse than the hane itself.
I do appreciate feedback, even though there's no comment section on my
website. All you need to do is either message me on one of the
plethora of social networks I'm a part of, or simply offer a comment
or contribution on
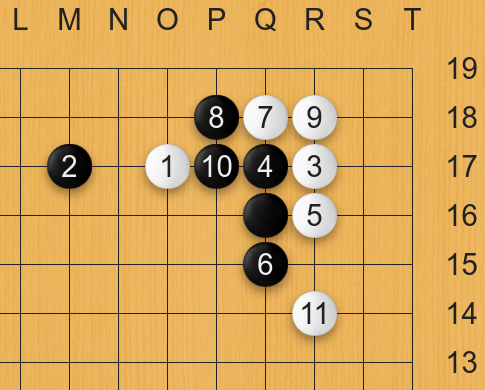
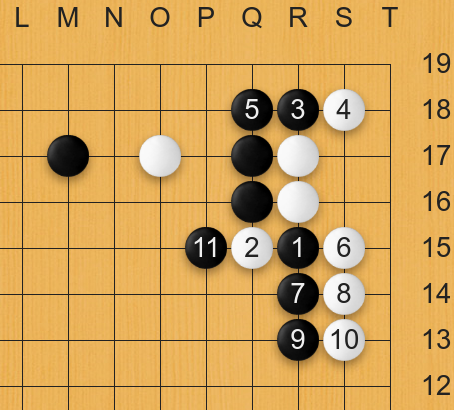
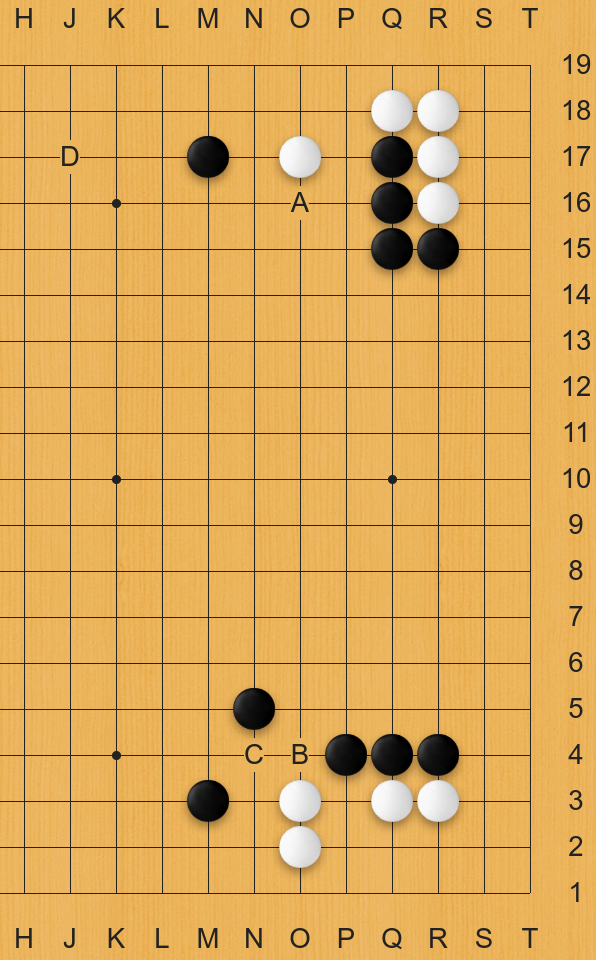
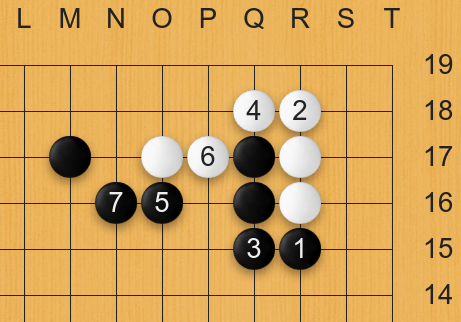
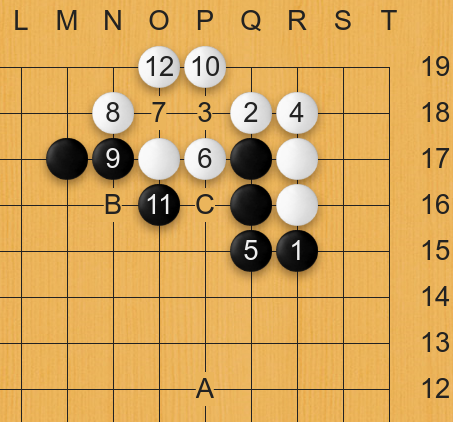
The trick play in question comes from one of the first josekis most people learn, shown in Diagram 1.
Interestingly enough, what I'm calling a trick play is actually also
called a mistakeA, in Diagram 2.
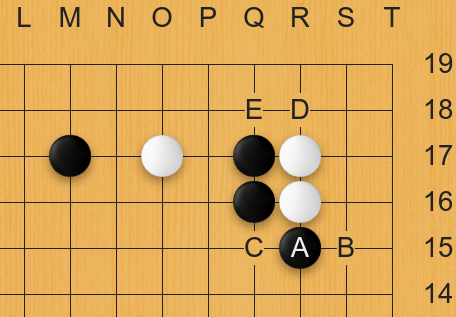
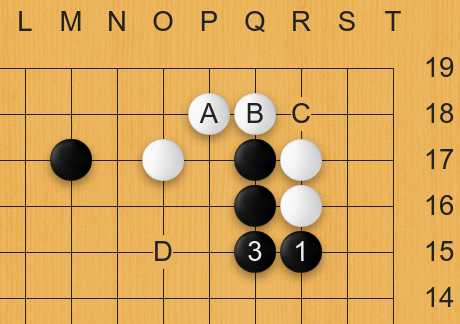
There are many options on how to react for White, mostly ranging from
B to E; tenuking is usually not one of them,
since taking the corner or having the either B or
E is quite big.
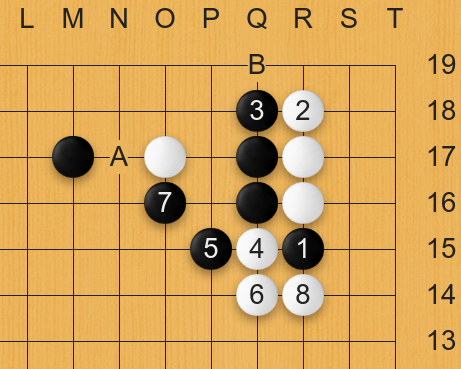
B would evolve into a typical 3-3 invasion, as seen in
Diagram 3. This would clearly be inferior to the joseki shown
previously, in Diagram 1 — it's worth mentioning that
this type of loss is not the end of the world, most mistakes are
actually made during the middle game anyway
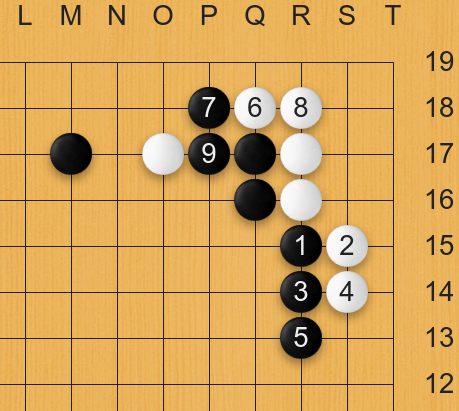
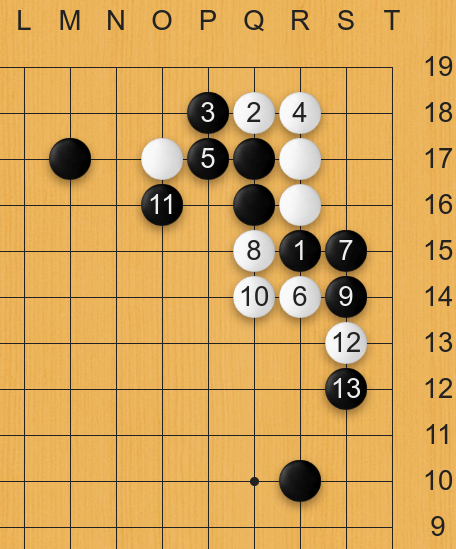
E seems to be not so unlikely, due to White's stone on
the left, but Black's shape after C in
Diagram 3 is very good. White will probably crawl on the
second line in order to live, as in Diagram 4.
C (in
Diagram 2) is just too good a shape. White ends up crawling
on the second line.
To my surprise, when evaluating the variation in
Diagram 4 with Leela
All that's left for White now is, then, to either C or
D, in Diagram 2.
C is what basically everyone learns as a DDK or high SDK,
despite it being quite the weird shape. It does work, but the question
remains: is it really the best White can do? Or: is this all even a
trick-punish ordeal or a (more or less) new joseki? Those are
assessments you will have to decide for yourself, but I do
believe most "reasonable" sequences are way more even than most
players want to acknowledge.
Let's dive a bit deeper into C first.
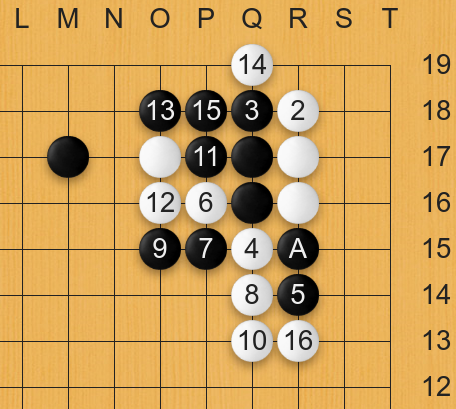
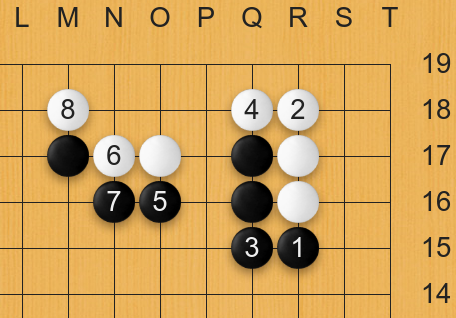
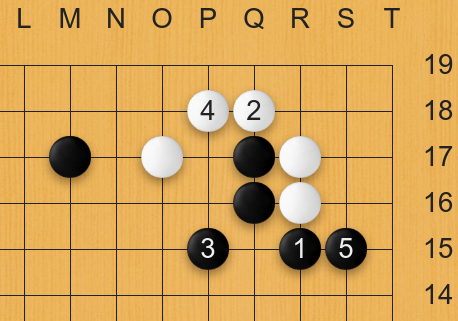
The reason C has become such a staple of a trick play is
that E in Diagram 2 then becomes fairly easy to
do, and White successfully captures a big corner, as seen in
Diagram 5.
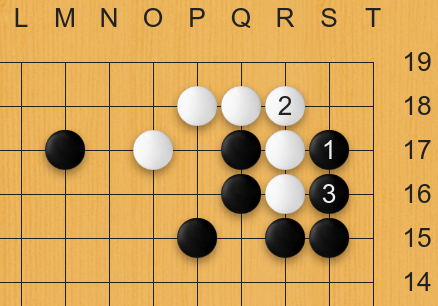
1.
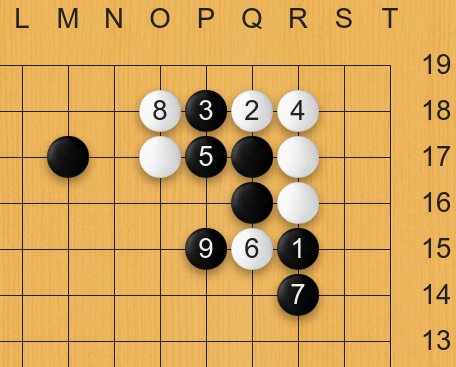
There are many ways of showing that Black's situation becomes quite
hopeless after Q18 in Diagram 5, and I'm not
going to show all of them, but Diagram 6 and
Diagram 7 should be able to illustrate two other important
ways of finishing the position for White.
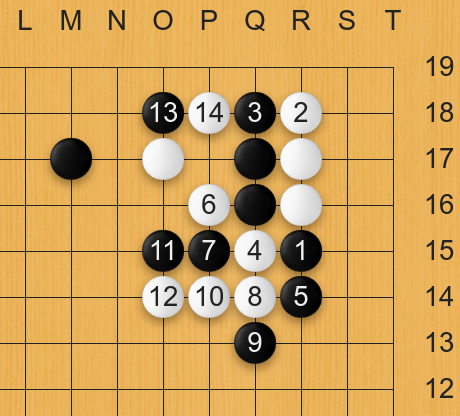
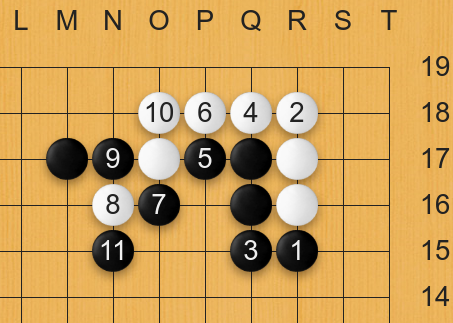
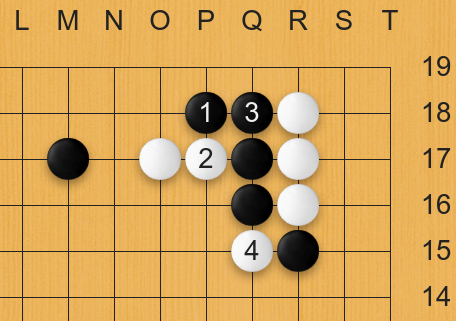
The thing is... the descent as a play has induced a generation of
players to fall for two mistakes making a right, in my opinion. The
cut at E in Diagram 2 doesn't seem to work, but
the descent looks even weirder. However, when Black realizes its cut
was a mistake, the sequence comes back into something more grounded in
reality. A simple connection puts Black in a position where it has
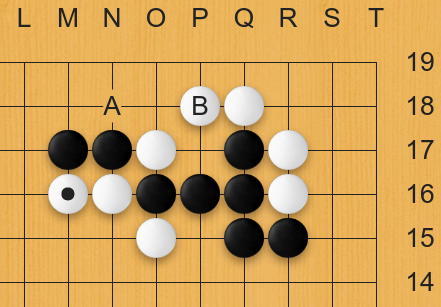
quite the thick wall, as seen in Diagram 8.
This wall is very thick, it's even thicker than most enclosure
josekis. Even though A doesn't fully connect to the stone
on the left, it's not as if other enclosure josekis didn't have their
fair share of problems either. The banal enclosure joseki at the
bottom of Diagram 9 features glaring weaknesses around
B and C, for instance. In the new pattern,
even if Black doesn't fully enclose — which is seen in the next
section, in a pro game, by the way —, Black still has
D available, to form a base for the stone at the top.
Leela actually rates the situations in Diagram 8 and Diagram 10 as very slightly better for Black, in fact. Considering the descent was supposed to be a punishment, I would say White has failed.
Another way through which Black could enclose White, seen in Diagram 10, is what most other players have suggested as the main sequence for disproving the descent as the punishment to the trick play.
A. White's territory is very small compared to Black's
thickness.
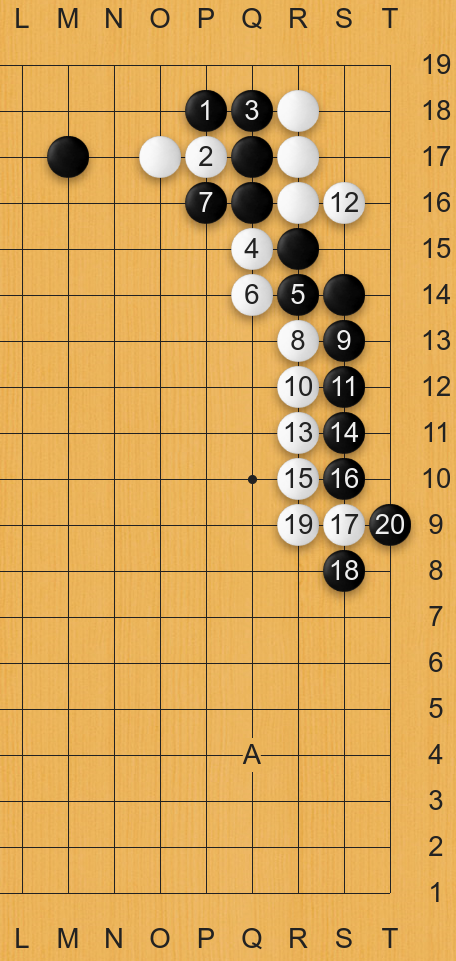
However, I think the cleanest example to debunk the descent is actually Diagram 11, which is also what's shown on Sensei's Library, and is exactly what Leela suggests. Black gets a very thick and clean shape from the tiger's mouth.
An extra variation, which is one of Leela's favorite sequences on this topic and also what's shown on OGS's josekipedia, is shown in Diagram 12 below.
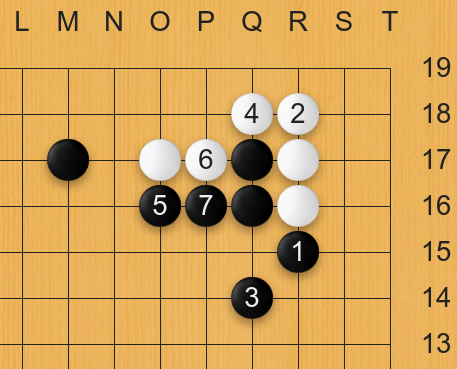
Now, I hope we can move on to move D, the hane, from
Diagram 2.
The most important, at least initially, sequence which differentiates
the descent from the hane is the final shape after Black's connection.
It should be clear to most dan players that the shape in
Diagram 13 is much stronger than White connecting at
C — I'm sorry to weaker players, but this is a
discussion you'll have to seek elsewhere.
One way of convincing yourself that Diagram 13 offers better
shape than the descent is to use a little tewari. If a cut
like in Diagram 13a breaks out, White will not need to answer
locally a move like A, when in comparison to
Diagram 13, where it would have warranted a capture
otherwise.
Black can try to resist, but the end result won't look nice, as seen
in Diagram 14. The A stone in
Diagram 14 is severely damaged; Black has poor shape, and
hasn't even captured the White stones to the center-right.
In terms of resistance, the best Black can hope for is using his
stones to force White's enclosure — which is seen in at least 2
pro games, from Walther's Pattern Search —, as in
Diagram 15. Black can and should probably fix its wall with a
tiger's mouth, to protect both B and C at
the same time; and White will have sente to diminish the effect of the
wall.
White's corner is considerably bigger now, Black will have to overcome a komi of 10+ points henceforth. It might not seem to make a huge difference to most, but, at least to my 1 dan brain, White's shape in Diagram 15 is at least one order of magnitude better than in Diagram 10, whatever that means. Leela thinks in a similar fashion — even despite Diagram 10 being under the whims of a ladder! —, Diagram 10 is rated at around 50±5%, while Diagram 15 hovers around 85% for White, which might finally fit the requirements for a trick play punishment.
This weird direction of play from Black isn't really all that weird after having witnessed some of the recent AI josekis, though, is it?
Black could offer a lot of resistance if there's a little bit of reinforcement in the area. Diagram 16 shows how a single stone can change the outcome completely.
If Black has a stone to the side, as in Diagram 16, it is wiser to revert back to a 3-3 invasion, like Diagram 17. In fact, it's likely the optimal choice, since it makes Black's original stone on the side way less efficient than desired. Curiously, this is what Tono Hiroaki 9p played against Cho Chikun 9p in 1991, mentioned in the next section.
.png)
The discussion on the hane actually doesn't end optimally with
Diagram 15, at least not according to most of the pros who
prefer the hane. Most references point the hane plus clamp as the most
likely optimal play for both sides, as in Diagram 18.
A for B is aji-keshi, a bad
exchange for Black. Pros seem to think this is enough of a punishment,
but I'll let you decide: isn't this discussion the epitome of the road
being more important than the destination: such a long-winded
discussion to end up with a "minimal" aji-keshi solution?!
A for B is supposedly good enough
punishment.
Lastly, I would like to mention that Leela offers way more complicated solutions to this problem, most of which are way above my pay grade. In general, though it prefers something of the form seen in Diagram 15, without the forced enclosure sacrifice. As usual with AIs, there are many loose enclosures and tenukis.
But before we move on with our lives...
White's move 6 on Diagram 18 could actually have
been more severe. However, it only works badly for Black if White has
the ladder, as shown on Diagram 19 below.
And, as a final comment, thanks to user aesalon_go on Reddit, KataGo prefers an unexpected tiger's mouth against the more proper hane, as in Diagram 20.
The main benefit from KataGo's S15 is being able to
drastically reduce White's eye space, as shown in
Diagram 20a. This will probably be sente.
This is a cut I'm analyzing on my own, using Leela as a crutch and confirmation tool. I think the overall results make sense, but, as always, I'm open to feedback.
One final variation that bugged me out quite a bit is the cut after a kosumi in the descent variations, which is shown below, in Diagram 21.
Black could have reverted the course to more normal variations by
playing, in Diagram 21, 3 at 4,
but, after White 2, Leela also sees Black
3 as the only option.
Black is still worse here, at least globally. My first intuition was to give Black the corner while squashing from the outside, and that's exactly what Leela thought as optimal, which is shown in Diagram 22.
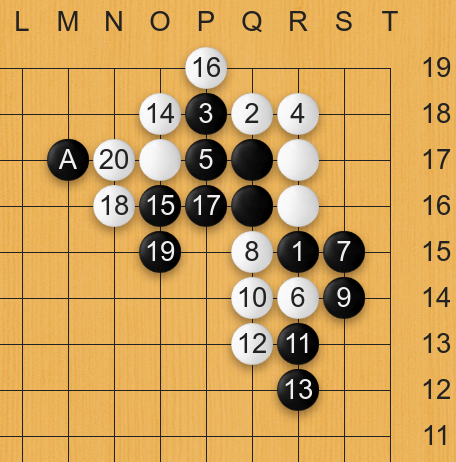
The closest I got to finding a successful professional use of this trick play is within a game between Kang Dongyun and Lee Jaeung, back in 2007, when they were both 5p. Lee Jaeung 7p, at move 24, uses this pattern to both enclose — sort of — the corner and switch to developing the left side, something which wouldn't have been possible with more standard josekis in this case, I don't think — anyway, it looks quite creative and scrappy.
Your browser doesn't support the WGo.js Player. Please use a more modern browser, like Brave, Chrome, Firefox or Edge.
Apparently, one of the pros, namely Tono Hiroaki 9p, in 1991, fell for the trap and got a smaller territory than he should. Or did he? White's stone on the side makes the 3-3 invasion more efficient than expected, as discussed in the previous section. His opponent was Cho Chikun 9p, and this "trick play" was likely a favorite of his, because he played it at least 3 times:
Your browser doesn't support the WGo.js Player. Please use a more modern browser, like Brave, Chrome, Firefox or Edge.
One of Cho Chikun 9p's games is suggested as a blooper in Sensei's Library. In it, he plays the supposed trick play against Otake Hideo 9p, gets countered with the hane, and then sets up a ladder that doesn't work, the typical pro play, you know. A gigantic, doomed to fail, fight ensues and Cho Chikun 9p loses:
Your browser doesn't support the WGo.js Player. Please use a more modern browser, like Brave, Chrome, Firefox or Edge.
Another worthwhile game to mention is
Shusaku's against Wada Kintaro
Your browser doesn't support the WGo.js Player. Please use a more modern browser, like Brave, Chrome, Firefox or Edge.
As previously said, I welcome criticism and feedback, so, if you have a new reference or more material on this topic, just contact me.
Here is a curated list of the relevant references — the numbering below does not reflect any hierarchy at all —:
- Reddit — Does anyone have a link to an article of a pro commenting on this "trick" play?
- Uberdude85's response on Life in 19x19
- Waltheri's Pattern Search for this trick play
- tchan001's Post on Life in 19x19
- TheBlackStone's Post on Life in 19x19
- Sensei's Library page on the joseki this comes from
- Yukigami's post on this trick play
- Shusaku's Game with this Trick Play (tchann001's find)
- Guo Juan's post/comment section on this trick play on Facebook
- Go Bloopers at Sensei's Library
- A post on Reddit with feedback for this article
- OGS' Josekipedia does include the more correct refutation for the trick play